
This is an easy to use guide on how to set up Traktor with our DJ Studio equipment - Pioneer DJM-900 mixer and Pioneer CDJ-2000s.
It’s important to stress that Traktor may be the first step on the road to your dream DJing career, and that once you’ve familiarised yourself with the software, you may want to move on to CDJs or vinyl so you can develop and refine your skills.
Of course, to help you feel like a real DJ it is essential that Traktor works with both a mixer and CDJs.
Before you begin to connect your laptop to the hardware you’ll need to have the correct drivers installed on your computer. The drivers for the DJM-900 can be found here: http://www.pioneerdj.com/en/support/software/djm-900nxs.
If you’re a windows user you may also want to download the drivers for the CDJ-2000s here: http://www.pioneer.eu/uk/support/software/CDJ-2000/page.html#download_189.
Once these are downloaded, plug your mac or PC into the mixer and the CDJs with three separate USB cables. If your computer doesn’t have three USB ports you will need to use a USB hub, which can be provided.
Do not plug the cables into the USB ports on the top of the CDJs, but rather, make sure you plug the square end of the cable into the back of the CDJ and the USB end into your laptop or hub. Most importantly, make sure you the hub is on.
The Setup Wizard is an invaluable tool for getting started with Traktor and Pioneer hardware. Access the wizard by first clicking on the preferences icon (the cog icon) in the top right hand corner of the screen.
The wizard is situated in the bottom left hand corner of the preferences menu, just bear in mind that if you have custom settings loaded the wizard will overwrite them. This means it may be a good idea to save your own preferences first.
When using our equipment choose the ‘yes’ option when prompted to select a hardware controller and select Pioneer as the manufacturer and the CDJ-2000 as the controller.

If you are prompted to choose a mixer select ‘yes’ at the appropriate screen and choose Pioneer and the DJM-900nexus. You can then choose your deck preferences within Traktor.
You may also need to make sure that audio setup is configured in the correct manner. This is where you need to go if you’ve run the setup with the DJM-900 previously, but have used Traktor with another interface since. If you have already run the wizard these options should be selected. Just bear in mind that the DJM-900 should be the selected audio device in the preferences menu.

In terms of output routing just make sure your version of Traktor matches the image below.
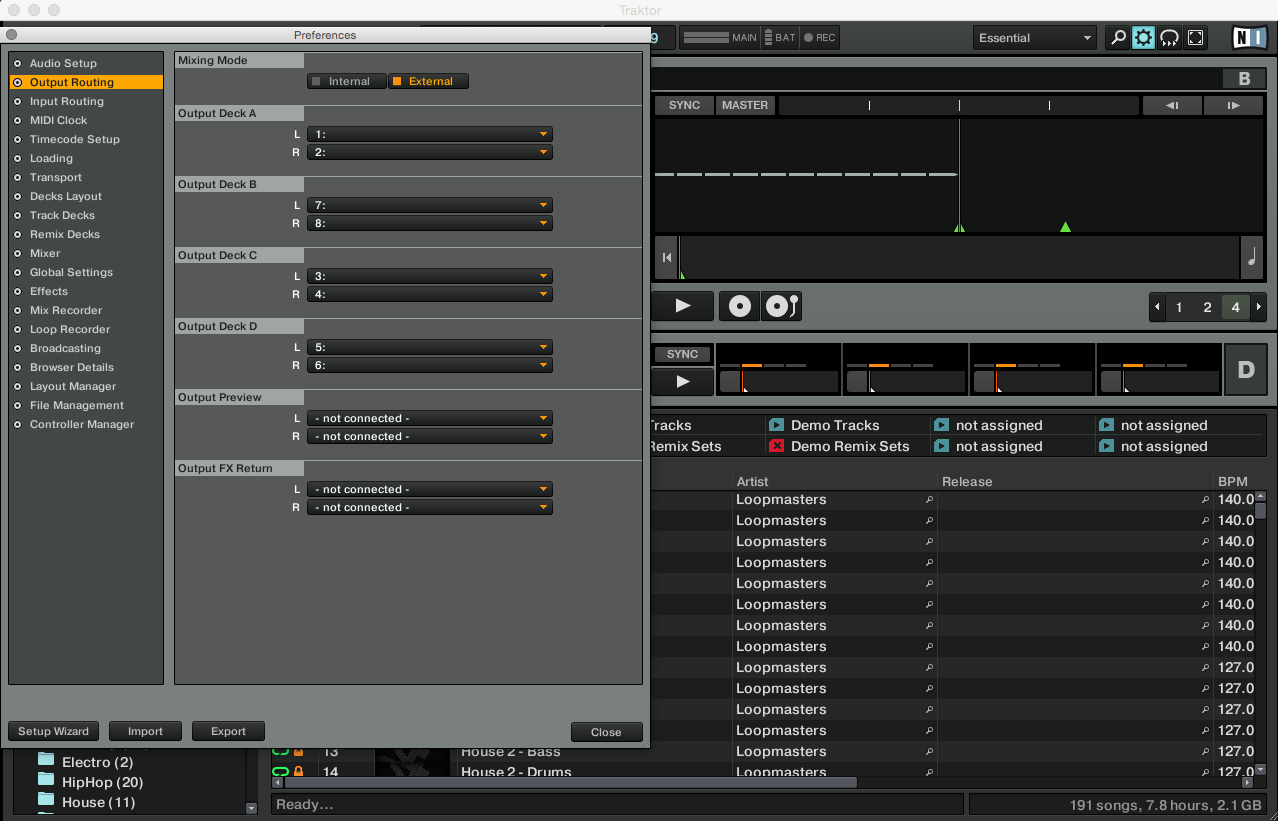
You will also need to make sure that the correct inputs are selected on the DJM-900 itself, which is the USB option furthest to the right on each channel. For example, the knob on the right at the top of the first channel of the mixer says ‘1/2’ which corresponds to the stereo signal of the CDJ that is connected to that channel.
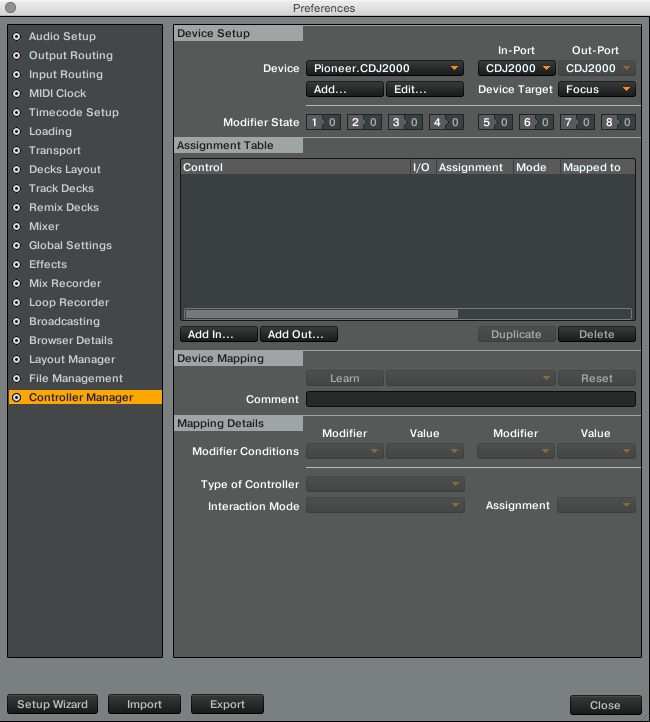
You will then need to select the ‘LINK’ option on the CDJs and choose Traktor. If you cannot select Traktor, you may need to go to controller manager in the preferences menu and select the CDJ-2000s.
You will then be prompted to push in the knob on the front of both CDJs to initialise Traktor and can begin playing.
Enjoy!
So you have created a great mix, something that will rock every dance floor in the world. It will get every man, woman and child bopping their heads along for sure. However you need to record it, so those said people can put it on their Ipods and listen to it on the bus to work. At Become A DJ we have a fully equipped DJ studio, with all industry standard DJ equipment. If you want to record your set we would be more than happy to help. Just book online here:
http://www.becomeadj.co.uk/dj_practice. Below is a brief run down on how to record your mixes using a standard Pioneer set up.
To record your mix please first download Audacity to your computer. Then download the Pioneer DJM-900 Driver software to your computer as well here. Make sure your mic input is muted/switched off on your computer.
Connect usb from the mixer to your computer.
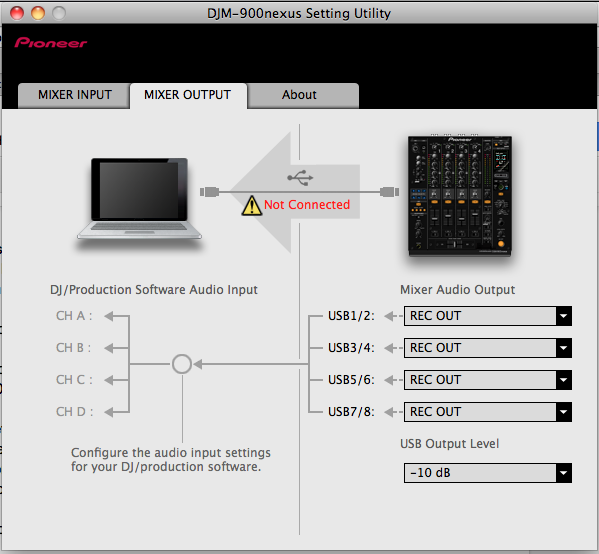
The pioneer DJM-900 software should come up automatically upon connection.
In the Mixer Output, Set USB 1/2 3/4 5/6 7/8 to REC OUT. USB Output level at -10db.
Open Audacity
Click FILE - preferences.
In the Devices section change: recording - device to DJM-900.
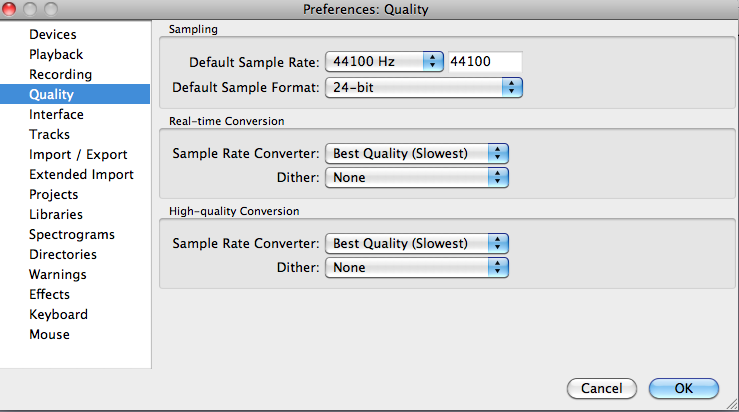
In the Quality section - Sample rate: 44100Hz.
Sample Format: 24-bit.
Real time conversion - Sample Rate Converter - Best Quality (Slowest)
Dither - None.
High Quality Conversion - Sample Rate Converter - Best Quality (Slowest) Dither - None.
Devices section:
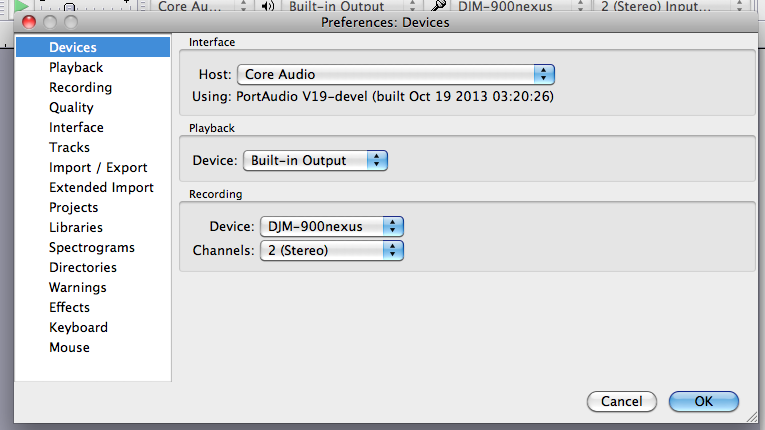
Quality section:
Now record your mix.
Click record (The red circle) in audacity and enjoy!
Please keep levels out the red. It will distort the mix and will not sound good in the recording.
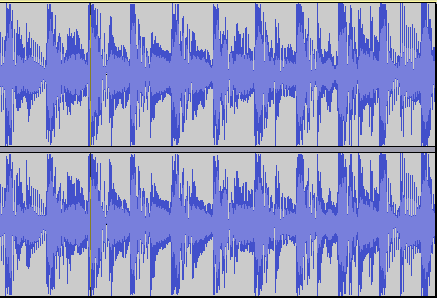
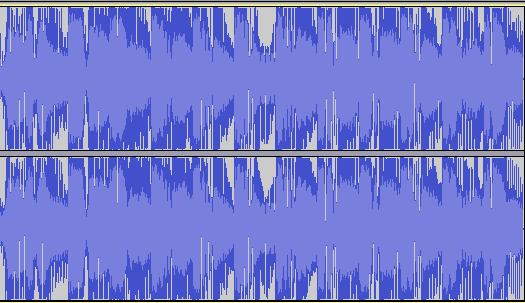
Below are pictures of two recordings, of the same piece of music. 1st picture is not clipped (How it should look). The 2nd is clipped (how it shouldn’t look).
1.
2.
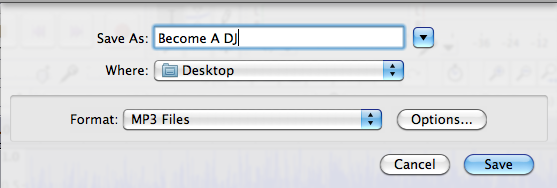
Exporting your mix.
Click FILE - Export (to export)
Name it and save it to where you want in the click down menu. IE. Desktop
Choose which format in the click down menu. IE. MP3, WAV, AIFF etc.
If you can’t save as a certain format you may be prompted to download software. Follow the instructions. Then choose which format you want.
Saving your Mix:
Click FILE - Save Project As
Name it and save it to where you want in the click down menu. IE. Desktop
Don’t change the format here.
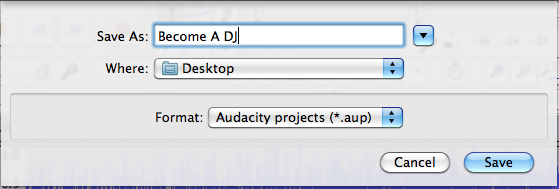
Then locate your exported mix on your computer.
You now have a recorded mix.